What if you could unlock more performance from the hardware you already own — no upgrades required? That's exactly what how to overclock CPU and GPU components is all about. Overclocking pushes your processor and graphics card beyond their factory-set clock speeds, delivering faster frame rates, snappier system response, and quicker render times. It sounds intimidating. But with the right tools and a methodical approach, it's well within reach for most PC users. This guide walks you through the full process — from understanding the basics to keeping your overclock stable for the long haul.
Before you start, it helps to know what hardware supports overclocking. On the CPU side, Intel's K-series chips and most AMD Ryzen processors have unlocked multipliers, which is what makes overclocking possible. You also need a compatible motherboard — typically a Z-series board for Intel or a B/X-series for AMD. RAM compatibility matters too, and the pairing can make or break stability; our best RAM for i7-8700K guide covers exactly how memory fits into a performance build. On the GPU side, nearly every modern discrete card from NVIDIA and AMD supports clock adjustments through third-party software.
The trade-off is heat and power consumption. Higher frequencies demand more voltage, and more voltage means more heat. Done carefully, the gains are real and the hardware stays healthy. Done recklessly, you risk crashes, instability, and accelerated component wear. The sections below cover both sides of the equation — so you go in with clear expectations and a solid plan.
Contents

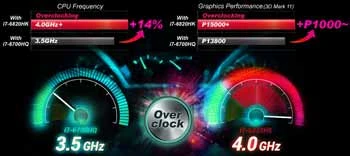
Manufacturers set conservative clock speeds to guarantee stability across a broad range of conditions — ambient temperature, power delivery quality, and silicon variation all factor in. Your specific chip likely has headroom to run 10–20% faster without much effort. The process starts simple: your BIOS/UEFI for CPU overclocking, and free software like MSI Afterburner for GPU overclocking.
If you're just getting started, keep these principles in mind:
Pro Tip: Save your BIOS settings to a profile before making changes. If instability creeps in later, you can revert to a known-good configuration without starting from scratch.
Advanced overclocking means going deeper than just raising the multiplier. You're tuning CPU core voltage (Vcore), adjusting power limits, optimizing memory sub-timings, and potentially using high-performance cooling. Builds centered on chips like the Ryzen 2700X often benefit from both XMP memory profiles and manual timing adjustments — our best RAM for Ryzen 2700X guide gets into the specifics of how memory speed interacts with platform performance.
Advanced users also deal with the silicon lottery — the reality that no two chips of the same model overclock identically. One unit might hit 5.1 GHz on modest voltage while another maxes out at 4.8 GHz. You can't know until you test. That variability is part of what makes enthusiast overclocking both frustrating and rewarding.
CPU overclocking happens entirely in the BIOS/UEFI. Here's a step-by-step process you can follow on most modern platforms:
A crash during testing isn't a disaster — it just means you've found the edge. The system resets on reboot. Drop one multiplier step and retest. That's the rhythm of the process.
Warning: Avoid pushing CPU core voltage above 1.4V on most modern processors. Sustained elevated voltage accelerates electromigration and can shorten your chip's lifespan — always check manufacturer guidelines for your specific CPU.

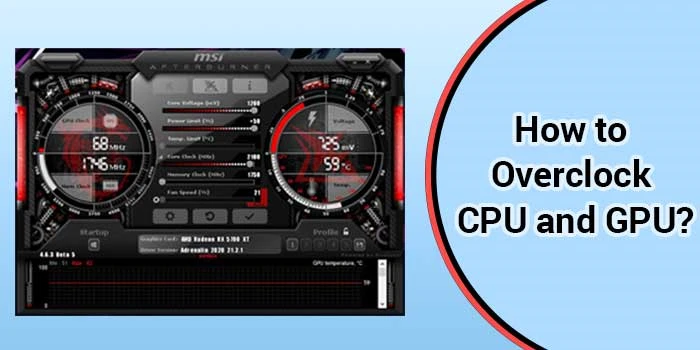
GPU overclocking is more beginner-friendly than CPU overclocking. You handle it entirely from within Windows using MSI Afterburner — no BIOS access required.
If you ever need to dial things back for a cooler or quieter system, our guide on how to underclock your GPU walks through the same process in reverse using the same tool.
| Factor | CPU Overclocking | GPU Overclocking |
|---|---|---|
| Primary Tool | BIOS/UEFI | MSI Afterburner |
| Skill Level Required | Intermediate | Beginner-friendly |
| Risk Level | Moderate | Low to Moderate |
| Recommended Stress Test | Prime95, Cinebench | FurMark, 3DMark |
| Safe Temperature Ceiling | ~85°C | ~83°C |
| Primary Performance Impact | Productivity, CPU-bound tasks | Frame rates, gaming, rendering |
| Voltage Adjustments Needed | Often yes | Rarely necessary |
Your cooling setup is the ceiling on how far you can push any component. A stock CPU cooler is designed to handle factory speeds — not the extra heat that comes with higher frequencies and voltage. Before overclocking, take cooling seriously:
Dust buildup on VRMs, heatsinks, and fan blades quietly erodes thermal performance over time. Our guide to how to clean a motherboard walks through the safest methods for keeping your hardware dust-free without causing damage.
According to Wikipedia's overview of overclocking, inadequate cooling is the most common cause of overclock failure — a finding that lines up with what enthusiasts consistently report in practice.
Voltage is the variable that separates a healthy overclock from a damaging one. The goal is to find the minimum voltage that sustains your target clock speed stably. More voltage is not better — it's just hotter and harder on your hardware.
Follow these guidelines:
Tip: If you need more than 1.35V on a modern CPU just to hold a modest 200 MHz gain, your chip may simply not be a strong overclocker. Forcing it higher isn't worth the trade-off — the extra heat and wear outweigh the performance benefit.
Crashes after overclocking almost always trace back to one of three causes: too high a frequency, insufficient voltage for that frequency, or a memory conflict. Here's how to work through each scenario:
If you're seeing a pink screen on your display after changing GPU settings, that's often a sign of GPU memory instability. Roll back your GPU overclock settings in Afterburner before diagnosing the display cable or monitor itself.
Thermal throttling is your hardware's way of protecting itself — the CPU or GPU automatically reduces clock speeds when temperatures exceed a threshold. It's a safety net, but it defeats the point of overclocking if it's happening regularly.
Signs that you're throttling:
Common fixes: reapply thermal compound, clean dust from heatsinks and filters, raise your fan speed curves in BIOS or Afterburner, and consider whether your overclock target is realistic for your cooling solution. Choosing the right GPU from the start makes thermal management easier — our best CPU for 1080 Ti roundup covers thermal and power balance when pairing components.
A stable overclock today doesn't guarantee stability a year from now. Components age. Thermal paste dries out. Dust accumulates. Staying on top of your system's health is part of the commitment that comes with running overclocked hardware.
Build these habits into your routine:
If you're considering a full hardware upgrade to improve stability and longevity, our best video cards for HTPC guide gives you context on which GPUs have demonstrated consistent performance over extended use.
Knowing when to reset to stock settings is just as important as knowing how to push past them. There are clear situations where pulling back makes more sense than continuing to chase performance:
Overclocking is ultimately a balance. The goal is more performance, not maximum performance at any cost. Sometimes the smartest overclock is a modest one that runs clean for years rather than an aggressive one that needs constant attention. For the flip side of this topic, our guide on how to underclock your GPU is worth reading — the same principles of stability and thermal management apply in both directions.
Learning how to overclock CPU and GPU components is one of the most practical skills you can build as a PC enthusiast. The process rewards patience — small increments, careful testing, and respect for thermal limits take you further than chasing maximum numbers. Start with your GPU in MSI Afterburner to get comfortable with the feedback loop, then move to your CPU when you're ready for the BIOS. Pick up a quality cooler, run your stress tests, and let the results guide you. Your hardware is capable of more than the factory settings suggest — now you have the map to find out exactly how much.


About Malcolm Woods
Malcolm Woods is a technology writer and sustainability advocate with a background in consumer electronics and a long-standing interest in the intersection of technology and environmental impact. He has spent years evaluating tech products — from smartphones and smart home devices to solar-powered accessories — with a focus on real-world performance, longevity, and value. At the site, he covers tech accessory reviews, smart home gear, buying guides, and practical how-to content for everyday technology users.
Go for the FREE Gifts. Or check out for free energy books from our best collection.
Remove Ad block to reveal all the secrets. Once done, hit a button below