Over 68 percent of DIY crafters say gold foil and metallic accents are their most-requested finish, yet most assume you need a commercial press to get them. You don't. Learning how to print gold ink at home is simpler than you think once you understand the right method for your printer. Whether you want elegant wedding invitations, custom business cards, or holiday gift tags, your home setup can deliver that luxe metallic look without a trip to the print shop.

The trick is that standard printers cannot produce true metallic shimmer on their own. Inkjet and laser printers work with CMYK color models, which blend cyan, magenta, yellow, and black. Gold is not in that color space. So you need a workaround. The two most popular approaches are toner-reactive foil with a laminator and gold-tinted inkjet cartridges. Each has trade-offs in cost, quality, and effort.
This guide walks you through both methods, the gear you need, maintenance considerations, and the mistakes that trip up beginners. By the end, you will know exactly which path fits your projects and budget.
Contents
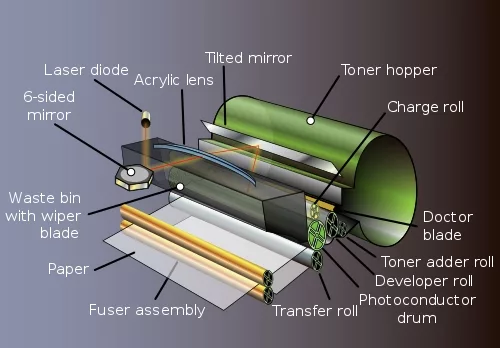
Before you start, you need to pick a method. Your choice depends on the printer you already own and the finish you want. A laser printer differs from an inkjet in ways that matter here. Laser printers use heat-fused toner, which is the foundation of the foil transfer technique. Inkjet printers can accept specialty gold ink cartridges from third-party manufacturers.
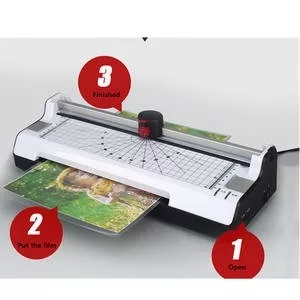
Toner-reactive foil bonds to printed toner when heat is applied. You print your design in black toner, lay the foil sheet over it, and run both through a laminator. The foil sticks only where toner sits. You need three things: a laser printer, metallic foil sheets, and a pouch laminator that reaches at least 300°F.
Foil sheets come in gold, rose gold, silver, and holographic finishes. A 100-sheet pack runs about $15 to $25. The laminator is your biggest investment. A decent one costs between $30 and $60. If you already own a laser printer, the total startup cost is under $80.
Some manufacturers sell metallic ink cartridges compatible with specific inkjet models. These cartridges contain mica-based pigments suspended in the ink carrier. The result is a subtle shimmer rather than the mirror-like shine you get from foil. Check cartridge compatibility carefully before buying. Not every printer accepts third-party cartridges without issues.
A third option is gold-colored cardstock with a white toner printer, but those machines cost upward of $3,000. For most home users, the foil method or gold ink cartridges are the practical choices.
| Method | Printer Type | Startup Cost | Finish Quality | Best For |
|---|---|---|---|---|
| Toner-reactive foil | Laser | $30–$80 | Mirror-like metallic | Invitations, cards, logos |
| Gold ink cartridge | Inkjet | $20–$45 | Subtle shimmer | Photos, art prints |
| Gold cardstock + toner | White toner (specialty) | $3,000+ | Professional grade | Small business runs |
| Gold wax thermal | Thermal transfer | $200+ | Solid opaque gold | Labels, ribbons |
Now that you have your tools, let's walk through both methods. The foil technique is more popular because it delivers a richer metallic effect. The ink method is faster for bulk jobs.
Start by designing your artwork in any graphics program. Set your design elements to solid black. Gradients do not work well with foil because the toner coverage is uneven. Print the design on your laser printer using the highest quality setting. Heavier toner coverage means better foil adhesion.
Once your print is dry, cut a piece of gold foil slightly larger than your design. Place the foil shiny side up on top of the printed area. Feed the sandwich through your laminator on its highest heat setting. Run it through twice if the first pass leaves patchy spots. Peel the foil away slowly. Gold will remain only where the toner was printed.
If you are choosing a laser printer for this, look at our laser printer buying guide for models with heavy toner output. Cheaper models sometimes apply too thin a layer for good foil adhesion.
Run a test strip before committing to a full sheet. Five minutes of testing saves you from wasting expensive foil on a bad temperature setting.
Install the gold ink cartridge in an empty slot on your inkjet printer. Most users replace the yellow cartridge since gold prints rarely need yellow simultaneously. Open your design file and assign gold elements to the channel that maps to your replaced cartridge. Print on glossy photo paper for the best shimmer effect.
The gold ink method is straightforward, but the output looks more like a warm bronze than true gold. It works well for backgrounds and accents rather than text. For sharper gold text, the foil method still wins.
Running specialty media through your printer adds wear. A little maintenance goes a long way toward protecting your investment. If you run a home printer regularly, these steps should already be part of your routine.
Foil transfers do not touch the printer internals, but the heavier cardstock you often use can stress the paper feed rollers. For inkjet users with gold cartridges, metallic pigments are thicker than standard inks. Run a printhead cleaning cycle after every 20 to 30 gold prints. This prevents clogging that leads to streaky output.
Laser printer fusers handle the heat fine, but check for toner buildup on the fuser roller if you notice ghosting on your prints. A fuser cleaning page, available in most printer menus, handles this in seconds.
Foil flakes can shed inside your laminator over time. Open the laminator every 50 passes and wipe the rollers with a soft cloth. Never use solvents. For your printer, run a plain sheet through after each metallic session to catch any loose particles in the paper path.
Knowing how to print gold ink at home opens up a surprising range of projects. Here are ideas that people actually complete with basic home equipment.
Wedding invitations are the most popular use case. A set of 100 foiled invitations costs about $8 in materials at home versus $150 or more from a print shop. Birthday cards, holiday greetings, and thank-you notes all benefit from a gold accent. Even a simple gold border elevates plain cardstock to something gift-worthy.
Business cards with a gold logo make a strong first impression. Print the logo area in heavy black toner, apply gold foil, and you have cards that rival professionally hot-stamped versions at a fraction of the price.
Small business owners use this technique for product labels, jar stickers, and packaging seals. Gold foil on a matte black label looks premium. If you sell handmade candles, soaps, or baked goods, this one detail can justify a higher price point. You can print a batch of 50 labels in under 30 minutes once your workflow is dialed in.
Scrapbookers and journal makers also use gold accents on titles, divider tabs, and photo frame borders. The foil method handles fine details down to about 8-point font size.
Misinformation about printing gold at home is everywhere. Let's clear up the biggest myths so you don't waste money on approaches that fail.
Some tutorials claim you can mix a specific CMYK value to create gold. You can create a dark yellow or brownish tone that reads as "gold-ish" on screen. On paper, it looks flat. True gold has reflective metallic properties that no combination of ink dots can replicate. The CMYK approximation works for digital mockups but disappoints in print every time. If you want actual metallic shine, you need foil or metallic pigment ink.
You will find blog posts suggesting you can run foil directly through an inkjet printer. Do not try this. Inkjet printers do not generate the heat needed to bond foil to paper. The foil can also jam the print mechanism and damage the printhead. Foil transfer requires either a laminator or a laser printer's fuser unit. If you are curious about the mechanical differences, our comparison of home office printers explains how each type processes media.
Gold foil needs heat and pressure to bond. If your method lacks either one, you will end up with flaky, patchy results every time.
Even with the right equipment, a few common errors can turn your gold prints into expensive scrap paper. Here is what to watch for.
Laminator temperature is the most critical variable. Too low and the foil will not stick. Too high and you get wrinkling or a matte finish instead of a shine. Most toner-reactive foils work best between 300°F and 330°F. Feed the paper slowly. Rushing through the laminator gives the heat less time to activate the adhesive layer.
If your laminator has adjustable speed, set it to the slowest option for your first test. You can speed up once you confirm coverage is solid. Each foil brand behaves slightly differently, so recalibrate when you switch suppliers.
Textured paper is the enemy of clean foil adhesion. The foil bonds only where it makes full contact with toner. On rough or linen-textured stock, the peaks get foil while the valleys stay bare. Smooth, coated cardstock in the 80 to 110 lb range works best. Glossy paper can work but sometimes causes the foil to stick in unprinted areas, creating unwanted gold patches.
For gold ink cartridges on inkjet printers, glossy photo paper gives the most visible shimmer. Matte paper absorbs the metallic particles and dulls the effect. If you are printing photos with gold accents, choose a semi-gloss finish as a compromise. Our guide on finding the best multifunction printer covers paper handling specs that matter for specialty media.
Once you get a successful gold print, the goal is repeating that result every time. Consistency comes from controlling your variables.
Create a test file with a range of design elements. Include thin lines, bold text, solid blocks, and small details. Print this test sheet once per foil brand and paper type. Label each result with the settings you used. This reference sheet saves you from guessing every time you start a new project.
For gold ink users, print a color swatch page monthly. Metallic inks can settle in the cartridge, causing color shifts over time. A quick comparison against your reference tells you if the cartridge needs shaking or replacement. Understanding your printer's capabilities helps. Our overview of budget-friendly printers discusses print quality benchmarks that apply here too.
Keep foil sheets flat in their original packaging, away from humidity and direct sunlight. Moisture causes the adhesive layer to activate prematurely, which means patchy adhesion later. A sealed plastic bin in a closet is ideal. Foil has a long shelf life when stored properly. Most brands stay usable for two years or more.
Gold ink cartridges are more sensitive. Store unused cartridges upright in a cool, dark place. Once installed, use them within six months. The metallic pigments settle faster than standard ink, so print something at least once a week to keep the nozzles flowing. If you notice gaps in coverage after a long idle period, run two to three cleaning cycles before wasting good paper on a full print.
Also consider your workspace. Foil scraps are lightweight and tend to scatter. Work on a clean, static-free surface and dispose of scraps immediately. Tiny foil flakes can end up in your printer's intake and cause feed issues over time.
Gold ink at home is not about buying expensive equipment. It is about mastering a simple process with the tools you already have.


About Malcolm Woods
Malcolm Woods is a technology writer and sustainability advocate with a background in consumer electronics and a long-standing interest in the intersection of technology and environmental impact. He has spent years evaluating tech products — from smartphones and smart home devices to solar-powered accessories — with a focus on real-world performance, longevity, and value. At the site, he covers tech accessory reviews, smart home gear, buying guides, and practical how-to content for everyday technology users.
Go for the FREE Gifts. Or check out for free energy books from our best collection.
Remove Ad block to reveal all the secrets. Once done, hit a button below