by Malcolm Woods
Charging a 12V battery with a solar panel takes 5 to 8 hours of direct sunlight for a typical 100Ah battery paired with a 100W panel — but your actual 12V battery solar panel charging time depends on battery capacity, panel wattage, and the quality of sunlight available. Get those three variables right and you eliminate guesswork entirely.
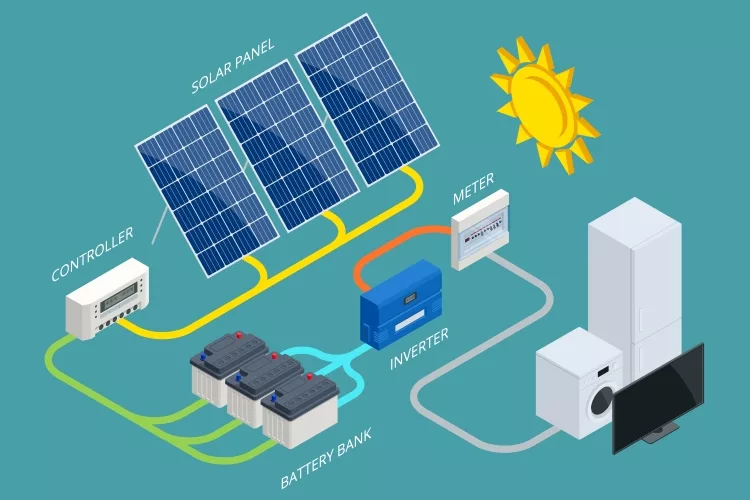
Solar charging is one of the most reliable ways to keep a 12V battery topped up off-grid, whether you're running an RV, a boat, a remote cabin, or a backup power system. The physics are simple: sunlight hits the panel, generates current, and that current flows into your battery. The details of how fast that happens — and how to make it happen faster — are worth understanding properly before you size or configure your system.
Browse more guides on panels, controllers, and off-grid power on the solar and clean energy category page. The rest of this guide gives you the numbers, the best practices, and the common pitfalls so you can set up your system with confidence.
Contents
Before you run a single calculation, you need to understand what actually drives charging speed. Three primary factors are at work: how much energy your battery needs, how much power your panel can deliver, and how many usable hours of sunlight you get in a day. Everything else — wire gauge, charge controller type, ambient temperature — is secondary but still meaningful.
Battery capacity is measured in amp-hours (Ah). A 100Ah battery holds 100 amps of current at 12 volts, which equals 1,200 watt-hours of stored energy. The state of discharge matters enormously: a battery drained to 50% needs only half the charge of one that's completely flat. Lead-acid batteries should rarely be discharged below 50% to protect their lifespan. Lithium iron phosphate batteries, like those detailed in the Battle Born LiFePO4 deep cycle battery review, handle much deeper discharges without degradation — making them a strong choice for solar setups that regularly cycle the battery.
A 100W panel doesn't deliver 100W continuously. Panel ratings are measured under Standard Test Conditions — 25°C cell temperature and 1,000 W/m² irradiance — which rarely match conditions in the field. In practice, expect 70–80% of rated output on a clear day. Clouds, dust, partial shading, and cable resistance all reduce effective output. Factor this into your estimates before sizing your system, or you'll consistently come up short.
The math is straightforward once you know your inputs. The key is accounting for real-world efficiency losses rather than relying on spec-sheet numbers alone.
Divide the energy needed (in watt-hours) by your panel's effective output (in watts). A 100Ah battery at 50% discharge needs 600Wh to reach full charge. With a 100W panel running at 80% efficiency — so 80W effective output — that's 600 ÷ 80 = 7.5 hours of good sunlight. The table below shows estimated charging times for common battery and panel combinations under those same assumptions.
| Battery Capacity | Discharge Level | Energy Needed | 50W Panel | 100W Panel | 200W Panel |
|---|---|---|---|---|---|
| 50Ah | 50% | 300Wh | 7.5 hrs | 3.75 hrs | 1.9 hrs |
| 100Ah | 50% | 600Wh | 15 hrs | 7.5 hrs | 3.75 hrs |
| 100Ah | 100% | 1,200Wh | 30 hrs | 15 hrs | 7.5 hrs |
| 200Ah | 50% | 1,200Wh | 30 hrs | 15 hrs | 7.5 hrs |
| 200Ah | 100% | 2,400Wh | 60 hrs | 30 hrs | 15 hrs |
| Assumes 80% panel efficiency. Add 5–10% for charge controller conversion losses. Lead-acid absorption phase adds time at high state of charge. | |||||
Peak sun hours (PSH) refer to the equivalent number of hours per day your location receives full-strength sunlight at 1,000 W/m². Most of the continental US averages 4–6 PSH. Phoenix gets closer to 6.5; Seattle closer to 3.5. This number multiplies directly against your panel's effective output. A 100W panel in Phoenix generates roughly 520Wh per day; the same panel in Seattle produces around 280Wh. The solar irradiance data published on Wikipedia provides a useful overview of how geographic latitude and climate affect available solar energy.
Solar charging has genuine strengths over shore power or generator charging, but it also carries limitations you should understand before treating it as your only power source.
Solar is free to operate once installed. No fuel costs, no engine hours, no noise. For stationary off-grid setups or RV camping in sunny regions, a well-sized solar system is essentially hands-off after initial configuration. It also scales naturally — if your needs grow, you add panels. Paired with adequate battery storage, solar charges during the day and your loads draw from the battery at night without any manual intervention.
Pro tip: Size your battery bank to cover two full days of consumption without sun — this buffer protects you during overcast stretches and prevents deep discharges that shorten battery life.
Weather dependency is the biggest constraint. A single overcast day can cut your output by 50–70%, and extended cloudy periods can drain a battery bank entirely. Physical space limits how many panels you can mount on a roof or vehicle. And charging slows significantly during the absorption phase — the final 20% of capacity takes nearly as long as the first 80% because the charge controller deliberately reduces current to avoid damaging the battery. Plan your system around this reality, not peak-case numbers.
Good performance starts with smart configuration. The hardware matters, but so does how you set it up and manage it day-to-day.
A charge controller regulates voltage and current flowing from your panel to your battery, preventing overcharge damage. You have two main types: PWM and MPPT. MPPT controllers are significantly more efficient — typically 93–98% versus 75–85% for PWM — and they harvest more power from the same panels, particularly in cold weather. Our guide comparing PWM vs MPPT solar charge controllers covers the performance differences in depth. For any system over 200W or running a 24V battery, MPPT pays for itself quickly. For help selecting the right model for your specific setup, the complete solar charge controller selection guide walks through every consideration.
Panel tilt has a direct and measurable effect on daily output. In the northern hemisphere, face panels south and tilt them at an angle equal to your latitude for the best year-round average. A panel lying completely flat loses 15–20% of potential output compared to a properly angled installation. More critically, avoid any shading. Even a single shaded cell in a series string can reduce that entire string's output by 50% or more — shading is disproportionately damaging and worth going to considerable lengths to avoid.
Start with the basics. Dust and grime accumulate on panel surfaces and reduce output by 5–15% in dry climates — a wipe-down with a damp cloth every few weeks delivers a real, measurable gain for zero cost. After the panels, inspect your wiring. Undersized cables create resistance and heat, both of which steal current before it reaches your battery. Use the correct wire gauge for your amperage over your cable run length, and replace any connectors showing corrosion or discoloration.
If your panels are repositionable, orient them to capture morning light and reduce afternoon shading. Solar cells are more efficient in cooler conditions — a hot panel on a summer afternoon underperforms the same panel on a cool spring morning by a meaningful margin. For fixed installations, even a small tilt away from flat can recover several percentage points of daily output. These adjustments don't require new hardware; they require only attention to how your existing setup interacts with the sun through the day.
Warning: Never connect a solar panel directly to a battery without a charge controller — even a small panel will overcharge a battery over time, causing permanent damage or a fire hazard.
Consistent maintenance preserves your equipment and keeps charging times predictable. Both your battery and your panels degrade quietly when neglected, and the losses compound over months.
For flooded lead-acid batteries, check electrolyte levels every one to two months and top up with distilled water as needed. Perform equalization charges every 30–90 days to reverse sulfation buildup. Keep terminals clean and connections tight — a loose terminal introduces resistance and slows charging. For lithium batteries, maintenance demands are minimal, but avoid storing them at 100% charge for extended periods if the system will sit unused; 50–60% state of charge is better for long-term storage and reduces stress on the cells.
Inspect your panel connections twice a year. Corrosion at MC4 connectors is one of the most common sources of invisible power loss in solar setups. Reseat or replace any connectors showing discoloration or pitting. Check that mounting hardware remains secure — a panel that has shifted from its optimal angle costs you output every single day. If your system includes a combiner box, verify that all bypass diodes remain functional so a shaded panel doesn't drag down the rest of the array.
The most common mistake in first-time solar builds is sizing the panel for the battery without accounting for daily energy consumption. If you draw 100Wh per day from your battery but your panel only generates 80Wh, you run a daily energy deficit that compounds until the battery is dead. Size your panel array to cover daily consumption plus 20–30% for system losses — not just the battery capacity in isolation. This single calculation error causes more frustration than any other factor in solar setups.
A charge controller programmed for flooded lead-acid batteries will push too high a charge voltage into a sealed AGM or lithium battery, shortening its life significantly. Always confirm that your controller's battery type profile matches your actual battery chemistry. Most modern controllers have dedicated profiles for flooded, AGM, gel, and lithium — use the correct one. This mistake is responsible for a surprising share of premature battery failures in otherwise well-designed systems. Also, never ignore parasitic loads: inverters, alarm systems, and control panels draw small amounts of current continuously, and a 1-amp parasitic draw consumes 24Ah every day before your intentional loads even run.
Under good conditions with 5 peak sun hours, a 100W panel at 80% efficiency delivers around 400Wh per day. A 100Ah battery at 50% discharge needs about 600Wh. That means you typically need 1.5 days of solid sunlight — or roughly 7 to 8 focused hours — to complete the charge cycle from half-depleted.
Yes, within limits. Doubling your panel wattage roughly halves your charging time, provided your charge controller and wiring can handle the additional current. A 200W panel feeding a 100Ah battery at 50% discharge can charge it in approximately 3.5 to 4 hours under good sunlight — a significant improvement over a single 100W panel.
No. Panels still generate power under overcast conditions, typically at 10–30% of rated output depending on cloud density. Charging continues, just far more slowly. Extended overcast periods significantly stretch your 12V battery solar panel charging time, which is why having a backup charging method — a generator or shore power hookup — is worth considering for full-time off-grid use.
For daily cycling use, a 100W panel is the practical minimum for a 100Ah battery, assuming 4–5 peak sun hours and moderate daily loads. If you're running appliances consistently or live in a low-sunlight region, start at 200W. Always factor in your daily energy consumption, not just the battery size, when determining the correct panel wattage.
Yes, with a charge controller in the circuit. The controller transitions to float mode once the battery reaches full charge, maintaining voltage without continuing to push current into a full battery. Without a controller, continuous connection from any panel will eventually overcharge and damage the battery — this is not a risk worth taking regardless of panel size.
MPPT controllers extract 20–30% more usable power from your panels under the same conditions compared to PWM, because they continuously optimize the operating point of the panel. That efficiency gain directly shortens your charging time. For systems larger than 200W, or where panels operate at a higher voltage than the battery, MPPT is the clear and measurable choice.
Yes, on both ends. Cold temperatures increase battery internal resistance, which slows the absorption of charge — particularly in lead-acid batteries. Hot temperatures reduce solar cell efficiency, so panels produce less power on the hottest summer afternoons than on cool spring days. Lithium batteries handle cold better than lead-acid, making them preferable for year-round off-grid systems in colder climates.
Your 12V battery solar panel charging time is entirely predictable once you account for battery capacity, panel wattage, and your local peak sun hours. Start with an accurate load calculation, match your panel output to your actual daily consumption, and install a quality MPPT charge controller — those three steps put your system on solid footing from day one. Head to our solar and clean energy section to explore more guides that help you build, optimize, and maintain your off-grid power setup with confidence.


About Malcolm Woods
Malcolm Woods is a technology writer and sustainability advocate with a background in consumer electronics and a long-standing interest in the intersection of technology and environmental impact. He has spent years evaluating tech products — from smartphones and smart home devices to solar-powered accessories — with a focus on real-world performance, longevity, and value. At the site, he covers tech accessory reviews, smart home gear, buying guides, and practical how-to content for everyday technology users.
Go for the FREE Gifts. Or check out for free energy books from our best collection.
Remove Ad block to reveal all the secrets. Once done, hit a button below